MUSIC TO YOUR EARS
Installing a chambered exhaust on a 1963-79 Corvette
text and photography
by Greg Donahue
Installing a chambered exhaust on a 1963-79 Corvette
text and photography
by Greg Donahue
 othing
sounds as good as the exhaust note coming from a set of side pipes as your
Corvette travels down the highway. This sound epitomizes what a Corvette is all
about. The only drawback to a set of Corvette side exhausts has been the price.
If your car is a fun car, it is very hard to justify spending $1,300 to $1,500
for a set of side pipes to achieve that perfect sound. There just hasn't been a
way to duplicate the side exhaust sound at a reasonable price...until now. Mid
America Designs, Inc., One Mid America Place, P.O. Box 1368, Dept. CF,
Effingham, IL 62401, (800) 500-8388, has designed a chambered dual exhaust
system for the '63 to '79 Corvette. This total system has the perfect side
exhaust growl, while still being mounted under the car and exiting out the rear.
This is not a glorified glasspack muffler, but a true chambered exhaust. It will
have that perfect "burble" at idle and cruising speeds which will allow you to
carry on a conversation or listen to your stereo, but when you "stand on it,"
you will know it is a Corvette. The entire exhaust system is aluminized and
comes complete with all necessary hangers, clamps, gaskets and brackets. The
best part is the price-under $300. The Corvette enthusiast's wish has been
granted. Side exhaust sound at regular exhaust prices.
othing
sounds as good as the exhaust note coming from a set of side pipes as your
Corvette travels down the highway. This sound epitomizes what a Corvette is all
about. The only drawback to a set of Corvette side exhausts has been the price.
If your car is a fun car, it is very hard to justify spending $1,300 to $1,500
for a set of side pipes to achieve that perfect sound. There just hasn't been a
way to duplicate the side exhaust sound at a reasonable price...until now. Mid
America Designs, Inc., One Mid America Place, P.O. Box 1368, Dept. CF,
Effingham, IL 62401, (800) 500-8388, has designed a chambered dual exhaust
system for the '63 to '79 Corvette. This total system has the perfect side
exhaust growl, while still being mounted under the car and exiting out the rear.
This is not a glorified glasspack muffler, but a true chambered exhaust. It will
have that perfect "burble" at idle and cruising speeds which will allow you to
carry on a conversation or listen to your stereo, but when you "stand on it,"
you will know it is a Corvette. The entire exhaust system is aluminized and
comes complete with all necessary hangers, clamps, gaskets and brackets. The
best part is the price-under $300. The Corvette enthusiast's wish has been
granted. Side exhaust sound at regular exhaust prices.
Project '64 was a prime candidate for the new chambered exhaust system. It installed completely in less than four hours, and best of all, it sounded great! So let's get started and allow the new chambered exhaust to make music to your ears.
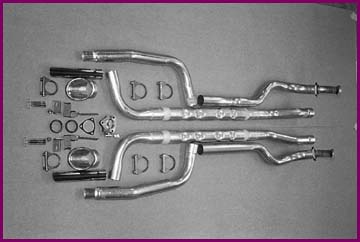
This is the complete chambered exhaust system including all clamps, hangers, brackets and gaskets, as well as new stainless steel exhaust extensions, bezels, heat riser gasket and stainless steel exhaust flange bolts and nuts. You will need common hand tools, a hydraulic jack and secure jack stands, a few bungee straps and a 2x6 approximately 30 inches long. You may also want to enlist the help of a friend. An extra pair of hands is quite helpful.
Start the project by jacking the car up as high as possible and putting it securely on jack stands. With the car in place, remove the entire exhaust system.
Whenever you install a new exhaust system, always replace the exhaust flange studs and nuts. Here are three different ways to remove the old studs: vise grips, stud puller socket and the old standby double nut. After the studs are removed, use a tap to clean the threads and then install the new studs. Remember, the longer studs go on the side with the heat riser.
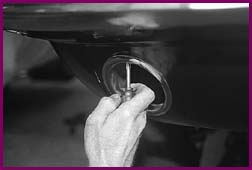
We wanted everything to look new, so we installed new exhaust bezels. With the exhaust removed, installation is much easier.
You will have to remove the old tailpipe hanger and bracket. When these are removed, install the new supplied rear hanger "L" bracket.
Before you install the exhaust system, pre-fit all of the pipes. If you have any fitted edges with burrs on them, use a file to clean them up. You want the pipes to fit together easily.
It is a good idea to install a new heat riser and gasket with your new system. Our original heat riser was totally burned out so a new one was definitely in order, and Mid America was able to supply one.
Install the new chambered system completely, but do not tighten any of the clamps. Make sure that the male and female ends of each pipe are bottomed out into each other. Install the rear hangers onto the rear hanger "L" bracket that you previously installed. Use bungee cords to tie the system up as close to the floor of the Corvette as you can. Now start to align each pipe, working from the front to the rear.
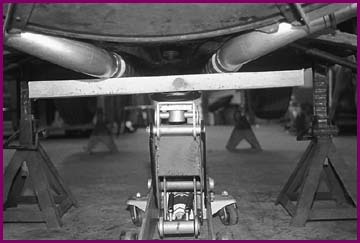
When you get to the rear, place a 2x6 approximately 24 to 30 inches long onto your jack pad and under both of the rear elbows of the chambered pipes. Pump up the jack and move the exhaust system up as high as you can without hitting the floor or the rear spring. This keeps the pipes from hanging down so low that you will have ground clearance problems. Check for clearance. If everything is OK, tighten the clamps at the crossmember and exhaust manifold studs.
It is very important to align the left front pipe to the manifold correctly. If it is not aligned properly, you will not have access to the oil filter. Here you can see that we have filter access along with clearance for our road draft tube.
You want the tailpipe to exit in the middle of the tailpipe bezel. This can be achieved by rotating the tailpipe at the rear-chambered tube elbow joint. Once you have the tailpipe in the correct location, tighten the chambered tube elbow clamp; then tighten the tailpipe hanger clamp and tailpipe extensions.
With everything installed, go back and check for pipe-to-body and frame clearance. If it touches anywhere, you will have a very noisy, irritating vibration. If you have clearance, tighten all the clamps and studs. Remember to re-install the exhaust ground strap.
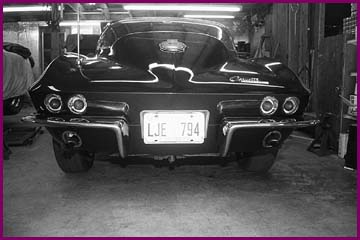
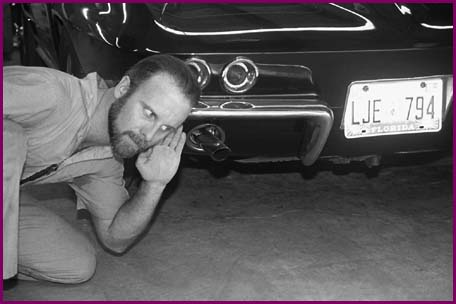
Here is our Project '64 with the new chambered exhaust system installed. Plenty of pipe-to-ground clearance, and ready to make music to our ears.
Mid America Designs, Inc.
Dept. CF
One Mid America Place
P.O. Box
1368
Effingham, IL 62401
(800) 500-VETTE (8388)

For a complete version of this story in print, look for Corvette Fever on your local newsstand.


Copyright(c) 1997: Dobbs Publishing Group.